Saturday, February 5, 2011

More on Gouache for journal work

Botanical artists and workshop teacher Cynthia Padilla has kindly allowed me to link to her article on using gouache!  Cynthia's worked with the medium for many years, first as a professional textile designer and now as a botanical illustrator.  I think you'll enjoy her tips, HERE.

Cynthia has mastered Winsor & Newton brand gouache, which is what I used for many years.  As you've seen, our own correspondent Roz Stendahl likes Schmincke Horadam and M. Graham, both of which re-wet well.

Stay tuned, Roz plans a post for us on the subject!  Meanwhile, see her comments on THIS post.

Gouache is great for using on toned paper, but it works well on white, too.  Roz uses it for all kinds of journal entries!
This was one of my gouache sketches on Nideggan paper...quick and fun.  Loved how the sky turned out!

New Link to Ink Pens

Our Swedish correspondent Nina Johansson just shared a pair of links on the Everyday Matters list that I think you'll enjoy, InkNouveau.and their store, Goulet Pens.  These look like a great deal of fun to browse, and Nina says she has ordered two pens from them, with very satisfactory results.  You can read her blog post HERE.

Many of us artist-journal keepers keep a constant lookout for the fountain pen that does just what we want it to, WHEN we want it to.  I love the wonderful springiness and flexibility of old (early 20th C.) Waterman pens, but they ARE old, and temperamental.  I've had two of them reconditioned, and they're still a bit moody at times.  They need frequent use and an occasional good cleaning.  The newer Waterman Phileas pens are much less temperamental, but also less flexible.

Many people love Lamy pens; my husband does, and so does Australian correspondent Alissa Duke.  Mine didn't seem to want to work well, so I can't speak to that--maybe Alissa will chime in about her new pen with the Extra Fine nib!  (I gave mine to Joseph and he loves it, so go figure!)


Nina got the Noodlers Flex Nib pen, and I'm willing to bet they're going to get a flood of orders!

Patterned hearts like Jim Dine

You need:

  1. drawing sheet A5 size
  2. crayons
  3. liquid water colour
  4. brush

Fold the sheet of paper into quarters. Cut a heart out of a piece in the hearts: Trace this heart four times with a pencil. Draw patterns in the hearts with crayons: stripes, circles, zigzag lines etc. Draw different patterns around the hearts.

Paint the whole sheet with liquid watercolour. The crayon will resist the ink.

Friday, February 4, 2011

I forgot my sketchbook home

I usually carry my sketchbook with me. But sometimes it's not where I thought I put it :)
Then I sketch on whatever I find - from napkins and paper towels to ruled notebook pages and margins of the magazine or newspaper. When I get home I scotch-tape them in my current journal. For example - today when I finished my run a little earlier I had a chance to observe birds of the wetlands for a few minutes - but no sketchbook. Hence - scrap paper drawings :)

Quick sketch, new journal


As I mentioned the other day, I really like the little journals from Moon Moth Press, and because I've been swamped lately, I decided to pop for another one instead of taking time for bookbinding right now.  It came, and it's delightful!

The little book with the wonderful cover, on top, is my first journal from them; haven't had a chance to shoot the new one yet, but it's from the same early 20th C. series of discarded books.

The journals are lightweight and small, like the outside dimensions of an old novel (because that's where they started, as you can see).  They're filled with 12 double-sided sheets of Arches 90 lb. HP paper and 6 pages of colored Bugra or Mulberry paper for notes (though I do art on them too, with gouache.)  This makes them ideal for travel, for special uses, projects, themes, or to fill in till you have time to do (or make) something else. (I've added their link to our sidebar of journal resources.)

We had a snow day this week (as did much of the nation!), so I stayed in and made bread, and got to use page one of the new journal to record it.

That first page in any new journal is always a big intimidating, unless you have a traditional starter, like Liz Steel does--she usually sketches the current watercolor set as her title page.  Prowl around her Flickr, you'll find some!  In my case I needed to sketch the bread before cutting it, so I was in a hurry!  Grabbed the new journal, no time for angst, and slapped it in with ink and watercolor.

The other reason for the hurry?  We have another blog online, Starving Artists in the Kitchen, and I'd promised to share the recipe, as SOON as I had it sketched!  So if you're a bread fan, head on over there for the recipe...

Concentric circles in the style of Kandinsky

You need:
  1. drawing sheet A3 size with 12 squares of 10 by 10 cm
  2. temperea paint
  3. brushes
  4. paper towels
  5. jar with water

Wassily Kandinsky (1866 – 1944) was a Russian-French painter. His style of painting originally belonged to expressionism, and is sometimes included in symbolism. Kandinsky was one of the artists who gave shape to the abstract art in the early twentieth century.

Kandinsky was inspired by music. According to his own timbre theory, each colour has its own language and expression, and each colour has a soul. Kandinsky tried to convert musical compositions into paintings. He heard colours in music and he saw music in colours. This correlation between music and colour is the starting point of this lesson.

Show students images of by Kandinsky. Tell that he listened to music while painting. Look at the painting 'Squares with concentric circles'. Which circle would belong to cheerful music? And what kind of music did Kandinsky hear while painting the dark circle?

Students are going to make a painting in the style of Kandinsky while listening to classical music. During this lesson they listened to Vivaldi's Four Seasons.
Each student gets a white sheet with 12 squares of 10 by 1o cm. Tell them to work from the outside to the middle. We may see no white anymore. Try to avoid two the same colours in one circle. Hang all paintings together on a bulletin board for a great group project!

Made by students of grade 1

Wednesday, February 2, 2011

In the style of Burton Morris

You need:

  1. several colours construction paper
  2. black cardboard 20 by 20 cm
  3. coloured cardboard 20 by 20 cm
  4. scissors
  5. glue
  6. black thick marker
During our USA trip in the summer of 2009, I visited in the Coca-Cola Company in Atlanta, There I saw the artwork of Burton Morris for the first time: five paintings of cola bottles in pop-art style surrounded by light blue bubbles. So beautiful! Now I found a way to do this in school. And I think I'm the first blogger with a Morris lesson!

Burton Morris (Pittsburgh, 1964) is an American pop-art artist. He is influenced by pop-art artists from the 60's and 70's, like Warhol, Lichtenstein and Haring. Now he is one of the most famous modern post pop-art artist. Morris's work shows a contemporary twist to traditional pop-art. His work is cheerful, energetic and colourful. His characteristic lines with the bright colours give his work a fantastic energy. Morris's work is known of tv-series like Friends and also appears in major advertising campaigns by U.S. companies like AT & T, Pepsi and Heinz.

Source: www.burtonmorris.com

Show artwork of Morris on the digital board. Discuss the features: bright colours, black outlines, little detail, movement by little lines, white lines that suggest light and the distinctive black star shape around or in much of his work.

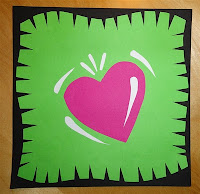
Students are going to make an artwork in the style of Burton Morris with the subject: Valentine's Day.

Step 1. Take two colours cardboard: black for the edge and one colour for the background. take a construction paper for the big heart.

Step 2. Cut the edges of the background cardboard sloping away, to make a sort of rug. You have to cut at least 1 cm around.

Step 3. Cut a large heart from the second coloured cardboard. Cut white 'light lines' from a white sheet for on and around the big heart.

Step 4. Cut some smaller hearts from several colours of construction paper. Cut white 'light lines' and paste them on the little hearts; all on the same side.

Step 5. Paste the big heart on the coloured cardboard. Paste the light lines on the heart and around it.

Step 6. Cut long triangles from the sides of the rug, the 'flashy stripes'. Paste the rug on the black cardboard.
Step 7. Paste the small hearts around the big heart; you may k de kleine hartjes rondom het grote hart, where you can go over the triangles. Outline the small hearts with a black marker.


Step 8. Cut the black background away, leaving about 2 mm on the edges.

Step 9. Paste the work on a coloured sheet (A4 size) and cut it into a square.

Made by students of grade 4 and 5