Showing posts with label watercolour paint. Show all posts

Friday, March 2, 2012

Astronaut in space

Made by a student of grade 3
You need:
  1. black construction paper

  2. white drawing sheets 

  3. water colour paint

  4. brushes

  5. jar with water

  6. crayons

  7. salt

  8. glitter

  9. scissors

  10. glue

  11. picture of yourself

  12. picture of an astronaut

Fold two sheets of drawing paper in half. Paint the four halves with different colours watercolour. Allow the paint to blend together; you may first draw patterns with crayons or use salt for a nice texture. Let both sheets dry.

Cut circles in various sizes from the painted paper. Swap painted paper with someone else if you like to. Create a composition of space on the black sheet. Paste some planets at the edge and cut them, to the endlessness of space even better.

Cut the astronaut and paste a picture of yourself on it. Paste planets and the astronaut. Use glitter or confetti to add stars.

Tuesday, November 22, 2011

In the style of Pablo Picasso


You need:
  1. white drawing sheet A4 size

  2. watercolour paint

  3. brushes

  4. black marker

  5. ruler and pencil

  6. scissors and gluetekenpapier op A4 formaat

  7. black construction paper 

Show some cubistic works of Picasso on the digital board. What do you see? What does the face look like?


Students draw a portrait. In this lesson we made a portrait of Zwarte Piet (Black Pete), the helper of our Dutch Sinterklaas. We called him Pietcasso! Of course this lesson can be done with any other portrait.

Colour the portrait with watercolour paint. Paint a background too. Outline with black marker.

Measure the face between hair and neck. Divide it in three and draw the lines with ruler and pencil on the drawing. Cut the three strips. Divide the strips in quares.

Paste the top of the face on a black sheet. Make a composition of the little squares; be sure there's not a facial square on the outside of the face. Paste the squares. Finally paste the lower face. 

.

Tuesday, November 15, 2011

Patterned leaves


You need:
  1. drawing sheet A4 size

  2. pencil

  3. black marker

  4. water colour paint

  5. jar with water

  6. brush

  7. white pencil

  8. coloured sheet

Draw contours of leaves with a pencil on a white sheet. Don't forget some half ones on the edges. Draw veins. Trace the leaves and veins with a black marker. Fill the spaces between the veins with as many different patterns you can.
Paint the space between the leaves with water colour paint. Leave a white edge around the leaves. Let dry. Paste the artwork on a coloured sheet and finish the half leaves with a white pencil on this frame.

Thursday, September 15, 2011

Peaks and valleys


Made by a student of grade 2


You need:


  1. drawing sheet A4 size


  2. crayons in bright colours


  3. watercolour paint


  4. brushes


  5. jar with water


Discuss with the students the difference between hills and mountains. When do we call something a mountain, when a hill? What does the top of hills look like? And what about the top of a mountain - this can be a sharp point or eroded and round, depending on the age of the mountain. 


Show students step by step how to draw a landscape with hills and mountains. Start with two wave lines Start with two wavy lines on the bottom of the drawing sheet. Draw diagonal lines down from the lowest points. Draw some high mountain peeks behind the hilss and draw a sun behind the peeks.


Fill the mountains and hills with patterns. Use crayons in bright colours. Each mountain should have its own pattern. Paint the mountains and the sky with watercolour paint. Patterns and lines will resist the watery paint.

Sunday, August 21, 2011

Sunflowers in five different materials

You need:

  1. sunflowers or pictures of them

  2. white drawing sheet A1 size, cut in strips of 30 by 65 cm

  3. five different colouring materials, like colour pencils, tempera paint, watercolour paint, oil pastels, crayons, coloured ink, aquarell pencils etc.

  4. brushes

  5. pencil, ruler

  6. coloured paper

  7. scissors

Look with the students at some sunflowers or pictures of them. How thick is the stem, what can you tell about the leaves, how are the petals divided, what colours do you see in the heart of the flower, etc.


Divide the sheet with thin lines into five strips of 13 cm high. Draw some sunflowers. Make sure the flowers themselves are drawn at the demarcation of the strips. Make sure too that in each compartment at least half a sunflower or leave is drawn.
Choose five different colour materials. Use in every compartment a different material. Consider yourself the order of the materials, for example from bright (markers) to less bright (aquarelle pencils).
Paste the work on a coloured background. Or cut the five compartments and paste them with some space between on a coloured background.
Made by students of grade 5

Friday, July 8, 2011

Portrait of your schoolmate

 
Made by students of grade 5
  
You need:

  1. drawing paper A4 size

  2. colour pencils

  3. watercolour paint

  4. brushes

  5. coloured ribbed cardboard

  6. stapler

After an instruction about proportions of a head, students draw their classmate who is sitting in front of him. The portraits are coloured with colour pencils, the background is painted with watercolour paint. The frames are made from coloured ribbed cardboard strips.

Wednesday, June 22, 2011

Artist Trading Cards exchange with Australia


Another Artist Trading Cards, this time with Anna Pietrolungo from Essendon North Primary School in Australia.

Contact with a school contact with a school on the other side of the world is so exciting for my students! We searched the school on Google Earth, visited Anna's art blog and the school's website.

Many ohs and ahs when they saw the Australian students wearing school uniforms. That's inconceivable in the Netherlands and it took quite a time to discuss the the pros and cons (although most of my students didn't see any pro at all!).


My students made about 35 cards. Subjects and materials were their own choice. I laminated them and sent them to Australia. Hopefully their cards are almost ready, because we only have two weeks school to go before my students leave us to go to highschool!

Thursday, April 28, 2011

Printed birds

You need:

  1. white drawing sheet A4 size

  2. two potatoes, middle and small size

  3. knife

  4. sauzer

  5. tempera paint

  6. piece of corrugated box cardboard  

  7. paper towel

  8. fine black marker

  9. brush

  10. watercolour paint

In 'The Usborne Complete Book of Art Ideas' I found this great lesson.

Place a paper towel on a saucer and spray a stripe of brown paint on it. Use the side of a piece of corrugated cardboard of about 7 cm to stamp branches.
Cut the medium potato in half and cut this half again. Stamp the bodies of the birds using red tempera.
Cut the half potato in two pieces. Use the quarter to stamp the tails.

Cut the small potato in half and stamp the faces of the birds.

Clean this half potato with a tissue and cut it in two. Stamp the wings.

Paint beaks, eyes and legs. Leave the work to dry. Paint the background with watercolour paint. Outline the birds with a fine black marker.

To make spring art work, you can add leaves by stamping them, cutting them out of green paper, using real dried leaves or .....use Paint shop pro, like I did!


Friday, April 22, 2011

Prisoners in World War II


You need:
  1. white drawing sheet A4 size

  2. ribbed cardboard

  3. pencil

  4. watercolour paint

  5. brushes

  6. jar with water

  7. black wool 

  8. glue

In Holland we rembember the victims of World War II on the 4th of May. The 5th of May we celebrate the day of liberation. In schools World War II is an important part of the history lessons. Students are always very interested in this topic.


"We had to draw one or more people in a concentration camp. Our drawings should show the fear and powerlessness of the prisoners. Most of all did well and the artworks were really beautiful. When the drawing was finished, we had to paint it with watercolour paint, using sad colours. We used black wool to make barbed wire and pasted it in front of the drawing. Finally we pasted the artworks on ribbed cardboard. It was an intense task, and it made us really think about that terrible time."


Artworks are made by students of grade 6


Thanks to Sylvia Versteeg

Sunday, March 27, 2011

Rapunzel

Made by a student of grade 1
You need:
  1. drawing sheet A4 size

  2. fine black marker, waterproof

  3. watercolour paint

  4. brushes

  5. jar with water

  6. wool

  7. cutter

  8. cutting mat

  9. scissors

  10. magazine

  11. glue

Rapunzel is a German fairy tale in the collection assembled by the Brothers Grimm, and first published in 1812. The Grimm Brothers' story is an adaptation of the fairy tale Persinette by Charlotte-Rose de Caumont, originally published in 1698.

In the tale, an enchantress separates Rapunzel from her parents and puts her away in a room at the top of a tower in a remote part of a forest. The tower has no door or stairs and only a window. The enchantress would climb Rapunzel's long braid of golden hair to visit her. The enchatress would call out to Rapunzel saying: "Rapunzel, Rapunzel, let down your hair, so that I may climb the golden stair". One day a prince hears Rapunzel's beautiful singing voice and wants to meet her. He secretly observes how the enchantress is able to visit Rapunzel in the tower. The prince climbs in the tower, meets Rapunzel and they fall in love. The wicked enchantress attempts to separate them, but eventually they reunite, and live happily ever after.

After telling the fairy tale, students start to make Rapunzel's braid of wool threads. Then they draw a tower with a top hatch, using a waterproof fine black marker. Colour it with waterpaint colour. Cut the sides of the hatch (teacher has to do this!!) and fold them. Cut a picture of a woman of girl out of a magazine and paste it on a piece of paper. Paste the braid on the head. Paste the piece of paper behind the hatch, looking carefully to get the woman's head in the middle of it and hanging the braid through the hatch.

Made by students of grade 1

Saturday, March 19, 2011

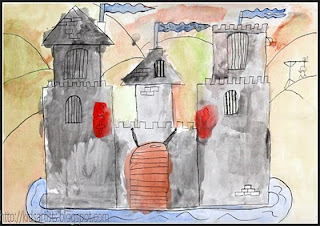
Fairy tale caste

Made by students of grade 4

You need:
  1. white drawing sheet A4 size
  2. indian ink
  3. dip pen
  4. watercolour paint
  5. brushes
  6. jar with water

See some pictures of castles and talk about the several parts: battlements, high thick walls, drawbridge, towers, schietgaten, portcullis etc. Talk about the location of a castle: often a high point, so oversee the area. Show that many castles were surrounded by a moat and discuss why this was.

Students draw their castle directly with indian ink on ther sheet. Add details like shutters, torches or flags. Draw the background, the surrounding of the castle. Colour the drawing with watercolour paint. The combination of indian ink and watercolour paint will give a perfect aged feeling.

Tuesday, February 8, 2011

Connected hearts

You need:
  1. white drawing sheet A5 size
  2. piece of cardboard
  3. scissors
  4. oil pastels
  5. colour pencils
  6. watercolour paint
  7. jar with water
  8. brush
  9. coloured paper
  10. glue
  11. metallic gel pen or marker
Draw a heart on a piece of cardboard and cut it out. Trace the heart several times on the drawing sheet. Hearts should overlap. Trace the heart also on the edged of the sheet. Draw smaller hearts within the traced ones; be sure there is about half cm space between the two lines.

Draw and erase the the pencil lines of the overlapping hearts as if they weave together: below - above - below - above.
Colour the hearts between the double lines with oil pastels. Paint the sheet with diluted watercolour paint and leave the work to dry. Trace the oil pastel harts on both sides with coloured pencils. Paste the artwork on a coloured sheet and finish the hearts on the frame, using a silver metallic gel pen or marker.

Advertising poster

New Dutch products, by students of grade 3

You need:


  1. white drawing sheet A3 size
  2. watercolour paint
  3. brushes
  4. jar with water
  5. markers
  6. set of rubber stamp letters
  7. stamp pad

We look at advertising posters and advertisements for food. Why are some advertisements more attractive than others? What products would you buy after seeing the the ad, and which not? How to attract attention to a new product? What kind of letters are used, and why these? What can you say about the use of colours in the advertisements?

Students invent a new food including the name of it and make an advertising poster. Materials: water paint and markers. Because making block letters may be too difficult for young children, I gave them a set of rubber stamp letters to use.

Thursday, January 6, 2011

Artist Trading Cards

Some weeks before Christmas, I was contacted by Amy Baldwin, art teacher at St. Pauls Lutheran School in Millington (Michigan). She wrote me she was a fan of my weblog. We emailed for a while, wondering if we could do a little project together. I read about exchanging ATC's on many art blogs, so I proposed to let our students make those little cards for eachother. This seemed to her very nice, so we got started!

Amy's students made ATC's for my students, my Dutch students did the same for hers.
A couple of days before Christmas I sent an envelope filled with 50 ATC's of my 23 students to Millington.

Yesterday we received the big envelope, full of ATC's! How exciting for my students to get those beautiful cards from the other side of the world! They admired the cards and were surprised about the Dutch words on some of them. Thank you very much Amy and thank you all, St. Paul's students!

Saturday, December 18, 2010

Penguins and polar bears

Made by Jorine, grade 6

You need:

  1. white drawing sheet A4 size
  2. plastic wrap
  3. watercolour paint
  4. brush
  5. jar with water
  6. black waterproof marker
  7. white tempera paint
  8. orange marker
  9. glue
  10. coloured cardboard
  11. white pencil

Paint a part of the sheet with blue water paint. Use lots of water. While the paint is still wet, push plastic wrap on it to create floes and then leave the sheet to dry. Remove the wrap.

Use a waterproof black marker to draw several penguins. Colour the black parts and draw wings. Use white tempera to paint the bellies. Leave the work to dry and draw eyes and beaks.

Draw a polar bear on the ice. Trace the pencil lines with a fine black waterproof marker. Paint the bear with white tempera paint, including the black lines to make them a bit hazy.
Paint the background with a mixture of white tempera and a little blue. In the example the mix is made of white tempera and the blue rinse water of the water paint.

Paste the work on a coloured background and draw ice crystals along the edges with a white pencil.

Thursday, December 9, 2010

Colourful Christmas trees

You need:

  1. two drawing sheets A4 size
  2. watercolour paint
  3. brushes
  4. jar with water
  5. tissue paper
  6. scissors
  7. glue
  8. ruler
  9. pencil
  10. gold or silver marker
  11. white correction marker
  12. glitter

Paint a background for the Christmas trees with water paint. Use different colours and let them blend into each other. Use plenty of water for nice bright colours.

Choose three colours of tissue paper. Fold the sheets several times and cut triangles and squares. Take a sheet of drawing paper and make it wet with a brush and water. Lay the pieces of tissue paper on this wet sheet. If the tissue paper is not wet enough, it won't bleed. Then make it wet again with a brush with water. Fill the sheet with these tissue paper parts and leave it to dry. Remove the pieces of tissue paper from the sheet when it is completely dry. The sheet will look like this:


Cut long triangles from the sheet that was coloured with tissue paper. You may use the schedule above (based on A4 size sheet of 21 by 29 cm - half cm will remain on both sides then). You can cut a piece from the bottom of the triangles if you want trees of various heights.

Paste these three trees with overlap on the water paint background. Don't paste the trees all at the same height, so you get depth. Cut some smaller triangles from the left overs if you want more trees.

Outline the trees with silver or gold marker. Draw a simple branch structure. Draw the strains with brown pencil or use the metallic pins. Draw snowflakes around and on the trees with a white (correction) marker or use chips from the punch. rond en op de bomen. Paste the artwork on a coloured background. Sprinkle some glitter on the forest floor.

All artwork is made by students of 11-12 years old

Thursday, November 18, 2010

My favourite animal

You need:

  1. white drawing paper A4 size
  2. watercolour paint
  3. crayons
  4. brushes
  5. jar with water
  6. coloured paper for background
Students made a drawing of their favourite animal in his own environment. The drawing was made with crayons and coloured with watercolour paint.

Both artworks are made by students of grade 1

Monday, November 1, 2010

City waterfront

You need:
  1. blue construction paper A4 size
  2. white drawing paper A3 size
  3. construction paper and/or ribbed cardboard in several colours
  4. scissors
  5. glue
  6. watercolour paint
  7. brushes
  8. jar with water

I found this lesson once on a German school website. The combination of cutting/pasting and painting is exciting! Students paste tight cut houses, and the reflection in the water is made with water colour paint, which is not tight at all - just as it should be!

Students cut rectangles of different heights and widths out of coloured paper. These are the bodies of the houses. Cut several triangles out of red construction paper, these are the roofs. Cut windows and doors.

Draw a line on 1 cm from the bottom of the blue sheet. Make a composition of the houses on this line, starting with the highest ones. Place the shorter houses in front of them (overlap). Paste the houses and roofs on the blue sheet. Paste windows and doors on them in different colours.

When ready, paste the blue sheet with houses on a white A3 size sheet. Use watercolour paint to paint the mirror image of the houses in the water. Paint as precise as possible, but don't use a ruler: reflections in water aren't that straight! Paint the water blue.

Made by students of 10-11 years old

Sunday, October 24, 2010

Whirling leaves

You need:
  1. white drawing sheet A4 size
  2. watercolour paint
  3. brushes
  4. jar with water
  5. small and broad black marker
  6. col0ured construction paper for background
  7. glue

Ask students a week before this lesson to take some flat dried leaves. Every student chooses one of his own leaves and outlines it several times with a pencil. Remember to draw not all the leaves in the same way on the paper, because they whirl down from the tree. Make sure some leaves go over the edge; those leaves will later be finished on the background.

Paint the leaves with watercolour paint. Use water to dillute the paint less or more. Choose real warm fall colours and try to make transitions in the colours by using wet in wet technique.

Paint the background blue. Use again the wet in wet technique, and/or choose for wet on dry. You don't have to paint exactly against the leaves, because they will be outlined with a marker.

Leave the work to dry and paste in on a coloured background. Outline the leaves with a thick black marker. Use a fine black marker for drawing the veins, while observing carefully the real leaves. Don't stop with outlining and drawing veins when you reach the background, but go on with it there.

Both artworks are made by students of 11 years old

Tuesday, October 12, 2010

Reflected canal houses


You need:

  1. white drawing sheet A4 size
  2. white crayons
  3. watercolour paint
  4. brushes
  5. jar with water
Dutch canal houses are famous for their facades: stepped gable, neckgable, bell gable, clockgevel or spoutgable. Draw those five gables on the blackboard and discuss them. Search the internet for photographs of canal houses or let the students search them (search canal house or grachtenhuis).

Draw a line at 12 cm from the bottom of the sheet. Draw some low canal house with a white crayon. Draw windows, treps and doors in them. Paint every house with a different colour of watercolour paint. The crayon will resist the paint and become visible. Paint a simplified reflection of the house under the line. Paint water and air.