Left: Various styles of Japanese pamphlets. ©2001 Roz Stendahl. Click on the image to view an enlargement.
Let's make 2011 a year of journaling with no excuses. ("I can't find the right paper," "I can't bind my own books," "No commercial books work for my media needs.").
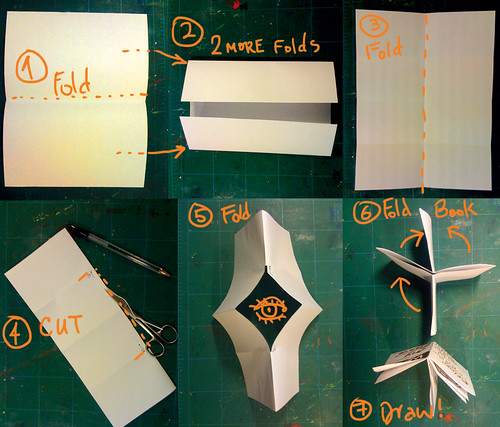
Kate's December 31, 2010 post advocates super-simple handmade journals. She has a great idea for accordion fold books.
Still aren't convinced that accordion folds are the way to go for journaling? Well they are simple to make and you can use them for some stunning results. Check out
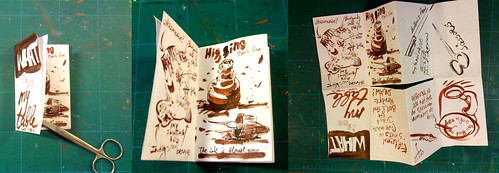
Marty Harris and friends in the moly_X over on Flickr if you aren't convinced that accordions are a great way to go. This group exchanges Moleskine accordions. Check out
Marty Harris' own State Fair Pig in a Moleskine accordion book: you can learn a lot from how he uses the page
Don't forget the simplicity of the accordion (remember we want this to be a no-excuses year). Kate talked about accordion journals made of scraps which I think is a wonderful approach. The accordion is an especially useful format if you like to sketch panoramas or flow your illustrations together.
Patty Scott, an artist in the MCBA Visual Journal Collective, uses the case of an existing book, cuts out the text block, and inserts her own accordion. It's a quick and elegant solution if you don't want to buy a moleskine or make a case. (At the linked post scroll down to see Patty's book at the end of that post.)
If holding an accordion is difficult for you try a pamphlet journal. (But know that Patty travels with bulldog clips to hold her book open and keep it from unraveling while she works) .
Beyond the simplicity of Kate's suggestion there is the economy of it. Kate uses the scraps she has left over from binding her square books!
Economy is one aspect of bookbinding that makes me think about pamphlet books. I teach a series of classes called Jumpstart Journaling which are aimed at getting people to journal right away, without making a fussy book structure that uses glue. The current offering in the
Jumpstart Journaling series is a Pamphlet Book.
While you might not be able to join me in the Twin Cities for this class, there's no reason you can't explore the ease and simplicity of pamphlet books on your own!
So many books on bookbinding have instructions for pamphlet bindings. Many of these instructions guide you through creating elegant and lovely pamphlet structures with decorative or structurally interesting covers. No embarrassment should attach to using them for your journaling. I list an
"essential bookshelf for bookbinders" on my blog. Just off the top of my head, as I look at that list, I can recall that Webberly, Golden, LaPlantz, and Doggett have pamphlet constructions in their books that I've listed listed. Shepherd has a hardcover pamphlet if you want to go all out!
But let's just say for now that you want to avoid glue. All you have to do is fold some paper in half and sew it up. That's called a signature.
Of course if you want great art paper you can cut or tear down a sheet of your favorite watercolor paper to size: make each piece two times as wide as you want the book, and as tall as you want the book. Your fold should be with grain of the paper.
(If you don't know how to determine paper grain I've written instructions here.)You'll need a cover for your book. The cover can be a piece of decorative cardstock weight paper or the first and last sheets of your signature which you've painted or decorated in some way. (Fold your cover sheet with the grain too, so that your fold is running parallel with the grain direction.)
You can either cut your cover to be flush (even) with the head, tail, and fore edge of your book (i.e., top, bottom and front edge of your book where it opens, respectively), or you can cut your cover sheet a little larger so that it overhangs at those areas and provides a bit of protection to your pages. (I like the second approach.)
You need to allow for ease at the fold when you are folding that cover paper, and for the thickness of the folded signature, so if you are new to binding I recommend that you add an inch to your sheet width (which is two times your page width) and then fold the cover sheet in the middle, insert the signature into that "cover" fold, and trim the overhang at the fore edge
after you've sewed it together.You can sew with simple pamphlet stitch of 3 holes or one of 5—if your book is taller than 5 inches I recommend a 5-hole stitch. Again, you can find a diagram for the pamphlet stitch in any book on bookbinding, and probably a gazillion internet places! Or you can do a running stitch: starting at the base of your signature on the inside simply go in and out of the holes all the way up the spine, capturing cover and signature with each pass, and then come back down going in and out. Even or odd numbers of holes, when you get back to the start, tie a square knot and trim the ends and go start journaling!
Webberley's
Books, Boxes, and Wraps has a myriad of ways to cover your pamphlet book—make wrap around covers, or covers with flaps that slit together for a little packet-like structure.
If one signature of paper isn't enough to last any you length of time, make a "dos a dos" pamphlet structure, which is a two-signature book. Think of a "z" and imagine sewing a signature into each of the two angles: they both share a common "backcover" which is the long stroke of the "z."
Japanese double pamphlets have a pleated spine which allows for the inset of two signatures in one stitch instead of only one. I like to make these a lot. I can't find my diagram for sewing a folded cover, but here's a diagram that shows the sewing using a split cover, i.e., two separate halves. Just imagine that they are folded at the center or at the edge on the right in the diagram making them one long sheet of paper.
You want your paper to be two times the width of your page width, plus 2 x the width of your pleat, plus any over hang you want at the fore edges. (Be sure to multiply any desired overhang by two as well as you have two fore edges!) You can additionally add extra for fold-in flaps! They should be at least 2/3 as wide as your page width or they have an annoying way of opening up and folding out while you try to sketch.
For a pleat I say start with one inch x 2 (i.e., 1 inch on either side of your center fold before the next fold). Add that to the 2 x your width of your page measurement (with overhange etc.). See how that works for you and then adapt from there to suit your needs. The extra wide pleat will be easy for you to sew until you know what you're doing; sewing with a quarter inch pleat (so 1/2 inch of paper for the pleat total) is a bit difficult for new binders, and not possible with all weights of paper.
(
Japanese double pamphlets are great if you have an artist book that exceeds one signature, or if you're making
an editioned book and need a quick and simple way to bind it.)
Left: The arrangement of signatures and covers for the sewing of the Japanese Double Pamphlet. ©2001 Roz Stendahl. Click on the image to view an enlargement.The reason I started teaching the split-pleat Japanese double pamphlet (shown in the diagram) is evident if you add up all the width you need for your cover: you end up requiring a mighty long sheet of paper all folded so that those folds are with the grain! Sometimes it's just easier to make two separate cover pieces!
Full or split cover, you create a stack like that shown in my diagram. (Note the covers will be outer sides facing each other when you make your stack.) You punch your sewing holes where the dashed line is indicating your fold. You punch through all the layers—both signatures and both covers. Then you sew the pamphlet stitch through those layers holding your parts in this orientation as well. When you have finished sewing the act of closing up the signatures allows the covers to fall into place. You can then trim the excess cover paper at the fore edge of each cover or you can fold over your flaps! (Don't trim or fold those edges until you sew because you might be a bit off. If you trim before sewing and are off you would have to refold which wouldn't look as nice—but could be hidden with collage material.) Your sewing knot will end up being in the center of one of your two signatures. I like to sew so that it falls in the center of the second signature.
Get really inventive and make dos a dos strutures that have Japanese double pamphlets at the folds! That's a simple no glue journal right there.
Need more pages and want something more than two signatures? Make a
multisignature softcover book like the ones I have on my website.
For more multisignature softcover books go here. My book list mentions Keith Smith's books. If you aren't good at coming up with stitches for sewn-on-the-spine structures like this check out his books.
Then let's say you don't want to bind AT ALL. Well I'm a huge fan of
what I call the unbound journal.
I like to use journal cards for short trips with people I haven't traveled with before. Or for my favorite event
The Minnesota State Fair.
Typically I've made cases for my journal card journals. Sometimes I make boxes for them, sometimes slipcases. But you can simply put them in an envelope! Or you can make a folder for them. You get the idea—
this should be simple.If the paper you use for journal cards is lightweight and flexible enough (140 lb. watercolor paper would be about the end of the line) you could bind them as a Japanese Stab binding.
When you work on your journal cards, if you intend to stab bind them later, allow a margin on the spine edge where you don't draw. This will be where you stab your holes, and anything in this area will not be seen when you bind your "cards."
(Note: Japanese Stab bound blank journals are not a good choice for visual journaling as they don't open flat.)Stab binding and other Japanese structures can be found in Kojiro Ikegami's excellent
Japanese Bookbinding: Instructions from a Master Craftsman.Keith Smith has a coptic stitch binding for single cards that I've never tried, but it sure looks tempting. (He has a whole book on binding single pages.)
Still not simple enough for you? Too much sewing? Too much folding? Too much loose stuff that you then have to worry about containing?
OK, So what's the simplest journal you can make? Take a printed book with sewn signatures (not something that's scruffed at the spine and glued or perfect bound), and use it to make an altered book journal. You can look into
one of my altered book journals made from a mystery book here. The book was a quality reprint that had sewn signatures and acid-free paper! While the paper wasn't intended to handle wet media it was high enough quality that I got by just fine, by modulating the amount of water I use, and by gessoing some pages (either with regular gesso or sometimes with absorbent gesso which is formulated to accept watercolor).
The fun thing about an altered book journal is you get all the visual texture of the text on the page to work with in your painting and journaling.
Search for quality sewn books for only dollars in antiques and collectible stores. Old record books with ruled lines and elaborate penmanship on the page also make interesting background texture!
Before I end I want to make one more pitch for the pamphlet book journal. I know it's a bit more involved than that very attractive altered book journal idea I just threw out, but here's the thing about pamphlet journals—you can always rebind them into one book, or make a slip case for them. So if your interest in binding grows, well you can do something with all those signatures.
Also if you lose one pamphlet journal you haven't lost your whole month, or year, or whatever.
But the best reason, besides ease of construction, for making and using a pamphlet style journal is that it also gives you an opportunity to test out a paper for the duration of that pamphlet and see how you like working on that paper. Most signatures are going to be 16 to 20 pages (depending on the thickness of the art paper you're using). It's pretty easy to make it through the worst paper in history if you have only 16 pages of it! Then you can be on to another candidate.
Finding a paper that takes the media you like to use—finding a paper that's fun to use, that makes you smile when you work on it—is the best way to ensure that you'll keep up with your journal habit!
If you'd like to read more about
selecting papers for visual journaling you can read my two part series on the topic here.
While this link gives specific paper recommendations for visual journals.
Make 2011 the year you leave excuses like "I don't know how to bind elegant books" behind. Just go for it.
It isn't the book folks, it's the mind, eye, and the hand. If you're happy with your paper choices it will show in your work. If you're drawing all the time, it will show in your work—and in your life (you'll be more observant and aware). That's journaling.Note: there is one other book I should mention: Woven and Interlocking Book Structures by Claire Van Vliet and Elizabeth Steiner. This book is way beyond my pay grade, but if you like to fold origami and do paper constructions and interlock things then go for it! The book is full of diagrams that look like they will make sense to anyone who isn't spatially challenged.You can reach me directly at rozjournalrat@gmail.com, or leave a comment. Thanks, Roz Stendahl