Showing posts with label collage. Show all posts

Friday, March 2, 2012

Astronaut in space

Made by a student of grade 3
You need:
  1. black construction paper

  2. white drawing sheets 

  3. water colour paint

  4. brushes

  5. jar with water

  6. crayons

  7. salt

  8. glitter

  9. scissors

  10. glue

  11. picture of yourself

  12. picture of an astronaut

Fold two sheets of drawing paper in half. Paint the four halves with different colours watercolour. Allow the paint to blend together; you may first draw patterns with crayons or use salt for a nice texture. Let both sheets dry.

Cut circles in various sizes from the painted paper. Swap painted paper with someone else if you like to. Create a composition of space on the black sheet. Paste some planets at the edge and cut them, to the endlessness of space even better.

Cut the astronaut and paste a picture of yourself on it. Paste planets and the astronaut. Use glitter or confetti to add stars.

Friday, January 27, 2012

International Space Station


You need:
  1. piece of cardboard 30 by 25 cm (box)

  2. space wallpaper or blue crepe paper

  3. gold and silver foil

  4. scraps paper and cardboard

  5. metallic supplies like candle holders, stones, beads etc. .

During a school project about space students of grade 5 made the International Space Station - ISS, where Dutch astronaut AndrĂ© Kuipers currently stays. We saw photographs of the ISS and talked about the different parts of it. 
All students get a piece of cardboard and wallpaper or crepe paper. With different materials they make their own representation of the ISS.


Saturday, November 26, 2011

Personalizing Journal Covers


Recently we were talking about ways to personalize journal covers...specifically, commercial journals.  This is an old Pelikan journal I used to use almost exclusively before I started binding my own...I had a whole stack of plain blue books with the deep black cloth spine, but they all looked just the same. 

I decided to make them not only my own, but more useful...I chose some of my favorite images from each book, scanned them, and made a photomontage in Photoshop.  Then, as you can see, I collaged it to the front of the book along with other elements, like ribbon and such, and added color and a bit of text, protecting all with a layer of acrylic floor wax (works great and is non-sticky!)

I added the date as well, so I know at a glance what time period each journal covers.  

I don't like journals that are too thick and chunky, handsome though they may be, so this works great for me.  It opens easily and flat, and doesn't have anything to break off or get in the way.  All the journals slide easily into my bookcase without anything to hang up, too...

Soooo...what do YOU like to do?  If you'd like to share an image, send it to me at kate.cathyjohnson (at) gmail.com and I'll do a composite post soon!

Tuesday, November 22, 2011

In the style of Pablo Picasso


You need:
  1. white drawing sheet A4 size

  2. watercolour paint

  3. brushes

  4. black marker

  5. ruler and pencil

  6. scissors and gluetekenpapier op A4 formaat

  7. black construction paper 

Show some cubistic works of Picasso on the digital board. What do you see? What does the face look like?


Students draw a portrait. In this lesson we made a portrait of Zwarte Piet (Black Pete), the helper of our Dutch Sinterklaas. We called him Pietcasso! Of course this lesson can be done with any other portrait.

Colour the portrait with watercolour paint. Paint a background too. Outline with black marker.

Measure the face between hair and neck. Divide it in three and draw the lines with ruler and pencil on the drawing. Cut the three strips. Divide the strips in quares.

Paste the top of the face on a black sheet. Make a composition of the little squares; be sure there's not a facial square on the outside of the face. Paste the squares. Finally paste the lower face. 

.

Saturday, November 5, 2011

Building a burger


I did this lesson in October 2009, and soon saw it on many blogs. It's still one of my favorite lessons.

This week we had the Dutch Week of School Breakfast, a good reason to build a lot of new burgers with students of grade 4.

How to do this? Look at this post.

Sunday, May 29, 2011

Sailboat regatta

You need:

  1. two sheets of white drawing paper

  2. sandpaper

  3. tempera paint in blue, green and white

  4. brush

  5. coloured paper

  6. brown paper (grocery bag)

  7. glue

  8. blue paper A1 size

Spray paint stripes in blue, green and white on a saucer. Lay a sheet of white drawing paper before you, with the small size up. Paint it with coloured waves. Don't mix the colours on the saucer, but dip the brush in two or three colours. Leave the sheet to dry.

Take the second white sheet and lay it before you with the small side up. Cut a piece of sandpaper as wide as the sheet and 8 cm high. Paste the sandpaper on the bottom of the sheet.
Tear the painted sheet in wavy strips. Tear the straight sides of the first and last strip too, so that all strips have two wavy sides. 
Place the strips overlapping on the white sheet. Start below. Place the second strip partly under the first one, the third under the second etc. Paste down the short sides of the waves on the left and right.
Cut boats out of a brown paper bag; bigger ones below, smaller ones at the top (perspective). Cut masts out of the paper bag and sails out of coloured paper. Paste the boats between the waves and paste the long sides of the waves at the same time. Paste sails and masts on the boats.  
Paste or staple all works together on large blue sheets (A1 size) to create a beautiful group work.


Artworks made by students of grade 4

Wednesday, April 20, 2011

Origami tulips


You need:

  1. origami sheets 10 by 10 cm

  2. strip of green cardboard

  3. scraps of green paper

  4. scissors

  5. glue


Fold the sheet twice, open and turn around.


Fold two diagonal lines and open it.


Fold the sheet double at a straight fold,

push the ends inward and push it flat.


It is a double square now.


Fold one point down.


Fold two points to the side.


Fold four tulips in different colours. Paste them on a piece of cardboard. Cut stems and leaves and paste them.

Saturday, March 26, 2011

The princess and the pea


You need:

  1. coloured construction paper
  2. fabrics
  3. a pea
  4. glue
  5. scissors
  6. scraps of construction paper, including gold and silver
  7. markers and/or colour pencils
Read the fairy tale 'The princess and the pea' of Hans Christian Andersen. Discuus after this what a princess bed would look like.
The students make the bed of the princess in this story. The bed has to be made of stripes of paper. At the bottom of the bed is a real pea, of course. Cut strips of fabrics for the matrasses (use special scissors for fabrics) and make a princess on top of this whole pile. Maybe the bed has even curtains or a little golden crown?

Made by students of grade 1

Tuesday, March 15, 2011

Surrealistic collage in the style of DalĂ­

By Tristan, 10 years old

You need:

  1. white drawing sheet A3 size
  2. magazines
  3. scissors
  4. glue
  5. tempera paint
  6. brushes

About DalĂ­

Salvador DalĂ­ (Figueres, 1904 – 1989) was a Spanish painter and versitile artist. in his younger years he was interested in painters like El Greco, Michelangelo and Diego VelĂ¡zquez. He focused his attention at that time to Impressionism and Cubism.
Dalí studied in Madrid from 1921 to 1924. In 1929 he moved to Paris. He met Pablo Picasso and André Breton and joined with surrealism.
In 1940 he moved to the USA and lived there for 15 years. After this he went back to Spain.
Dali's work can be divided in four periods.

Early period (1917-1927) - In this period DalĂ­ made paintings of the landscape around Figueres. These works already show his kinship with Impressionism and Cubism.

Transition period (1927-1928) - This period is characterized by experimentation. He uses different textures, made with paint resins, sand, stone, cork and gravel.

Surrealistic period (1929-1940) - The Surrealists were not sufficient to logic alone. They focused on dreams and the subconscious. DalĂ­ explored his own fears and fantasies and painted them on canvas through symbolic images in a very realistic, almost photographic style. He called his paintings "hand painted dream photographs'.

Classical period (1941-1989) - Dali stopped in 1941 with the surrealist style. He became fascinated by religion and modern science and found his inspiration in the ancient and Renaissance art.

Back to work

Show some surrealistic works of Dali and discuss the salient features: his work looks like a photo, contains 'strange' elements - things lijkt op een foto, bevat 'vreemde' elementen - things that can not actually. The work will surprise or a shock sometimes. Explain the difference between realism (reality painted on canvas, like a photo) and surrealism - realism with strange elements.
Tell students that they have to make a surreal collage today. For this they cut pictures from magazines, arrange them on a sheet and paste them. They may, if no proper background is to be found, paint a part of this background.

When ready

Discuss the artworks: what surrealistic elements do you see? And what are the realistic elements? What do you think of the combination of both?

Wednesday, February 2, 2011

In the style of Burton Morris

You need:

  1. several colours construction paper
  2. black cardboard 20 by 20 cm
  3. coloured cardboard 20 by 20 cm
  4. scissors
  5. glue
  6. black thick marker
During our USA trip in the summer of 2009, I visited in the Coca-Cola Company in Atlanta, There I saw the artwork of Burton Morris for the first time: five paintings of cola bottles in pop-art style surrounded by light blue bubbles. So beautiful! Now I found a way to do this in school. And I think I'm the first blogger with a Morris lesson!

Burton Morris (Pittsburgh, 1964) is an American pop-art artist. He is influenced by pop-art artists from the 60's and 70's, like Warhol, Lichtenstein and Haring. Now he is one of the most famous modern post pop-art artist. Morris's work shows a contemporary twist to traditional pop-art. His work is cheerful, energetic and colourful. His characteristic lines with the bright colours give his work a fantastic energy. Morris's work is known of tv-series like Friends and also appears in major advertising campaigns by U.S. companies like AT & T, Pepsi and Heinz.

Source: www.burtonmorris.com

Show artwork of Morris on the digital board. Discuss the features: bright colours, black outlines, little detail, movement by little lines, white lines that suggest light and the distinctive black star shape around or in much of his work.

Students are going to make an artwork in the style of Burton Morris with the subject: Valentine's Day.

Step 1. Take two colours cardboard: black for the edge and one colour for the background. take a construction paper for the big heart.

Step 2. Cut the edges of the background cardboard sloping away, to make a sort of rug. You have to cut at least 1 cm around.

Step 3. Cut a large heart from the second coloured cardboard. Cut white 'light lines' from a white sheet for on and around the big heart.

Step 4. Cut some smaller hearts from several colours of construction paper. Cut white 'light lines' and paste them on the little hearts; all on the same side.

Step 5. Paste the big heart on the coloured cardboard. Paste the light lines on the heart and around it.

Step 6. Cut long triangles from the sides of the rug, the 'flashy stripes'. Paste the rug on the black cardboard.
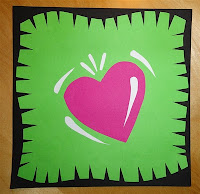
Step 7. Paste the small hearts around the big heart; you may k de kleine hartjes rondom het grote hart, where you can go over the triangles. Outline the small hearts with a black marker.


Step 8. Cut the black background away, leaving about 2 mm on the edges.

Step 9. Paste the work on a coloured sheet (A4 size) and cut it into a square.

Made by students of grade 4 and 5

Tuesday, January 25, 2011

Abstract relief

You need:

  1. piece of grey cardboard 18 by 24 cm (cereal box)
  2. tissue paper
  3. wood glue
  4. several zijdevloeipapier
  5. houtlijm
  6. various free materials like rope, pasta, shells, sticks, buttons, etc.
  7. varnish
  8. coloured cardboard for frame

Look at the painting Catalan landscape of Joan MirĂ³ (Google pictures). Discuss what is on this painting, what things are definable and which are not. Explain the difference between realistic and abstract.

Tell the students they are going to make an abstract relief. Students make a composition of different items on their grey cardboard. They have to make a horizon line at least. Paste the different items with glue. Don't paste the items too close together and make sure it is not too full.

When the composition is ready, bring wood glue on all items and the cardboard. Cover everything with tissue paper. Push the paper firmly against the pasted items to make the tissue paper crumple. Here and there the paper will rip, so paste multiple layers of the same colour paper.

Finish with a layer of wood glue or wait until the artwork has dried and then apply a layer of varnish. Paste the artwork on a coloured background.

All artworks are made by students grade 3

Thanks to Ann de Naegel and her students.

Saturday, January 8, 2011

Egg carton head

Made by Tristan, grade 4

You need:

  1. cardboard A3 size, black or brown
  2. egg cartons
  3. scissors
  4. glue

Bring some things with an obvious texture: a piece of wood, stone, glass, a knitted sweater, carpet etc. Let the children feel and express what they feel. Show them with a flashlight (shine directly or indirectly) that texture can be soon also.

Give each student two egg cartons and a piece of cardboard. Students have to make a head of the egg cartons, using the different textures of the material. The inside of the carton feels different as the outside.

Slide the pieces (torn or cut) on the cardboard until you have a good composition. Paste everything securely, taking care to minimize the black or brown carton shown in the face.

Thursday, January 6, 2011

Artist Trading Cards

Some weeks before Christmas, I was contacted by Amy Baldwin, art teacher at St. Pauls Lutheran School in Millington (Michigan). She wrote me she was a fan of my weblog. We emailed for a while, wondering if we could do a little project together. I read about exchanging ATC's on many art blogs, so I proposed to let our students make those little cards for eachother. This seemed to her very nice, so we got started!

Amy's students made ATC's for my students, my Dutch students did the same for hers.
A couple of days before Christmas I sent an envelope filled with 50 ATC's of my 23 students to Millington.

Yesterday we received the big envelope, full of ATC's! How exciting for my students to get those beautiful cards from the other side of the world! They admired the cards and were surprised about the Dutch words on some of them. Thank you very much Amy and thank you all, St. Paul's students!

Thursday, December 9, 2010

Colourful Christmas trees

You need:

  1. two drawing sheets A4 size
  2. watercolour paint
  3. brushes
  4. jar with water
  5. tissue paper
  6. scissors
  7. glue
  8. ruler
  9. pencil
  10. gold or silver marker
  11. white correction marker
  12. glitter

Paint a background for the Christmas trees with water paint. Use different colours and let them blend into each other. Use plenty of water for nice bright colours.

Choose three colours of tissue paper. Fold the sheets several times and cut triangles and squares. Take a sheet of drawing paper and make it wet with a brush and water. Lay the pieces of tissue paper on this wet sheet. If the tissue paper is not wet enough, it won't bleed. Then make it wet again with a brush with water. Fill the sheet with these tissue paper parts and leave it to dry. Remove the pieces of tissue paper from the sheet when it is completely dry. The sheet will look like this:


Cut long triangles from the sheet that was coloured with tissue paper. You may use the schedule above (based on A4 size sheet of 21 by 29 cm - half cm will remain on both sides then). You can cut a piece from the bottom of the triangles if you want trees of various heights.

Paste these three trees with overlap on the water paint background. Don't paste the trees all at the same height, so you get depth. Cut some smaller triangles from the left overs if you want more trees.

Outline the trees with silver or gold marker. Draw a simple branch structure. Draw the strains with brown pencil or use the metallic pins. Draw snowflakes around and on the trees with a white (correction) marker or use chips from the punch. rond en op de bomen. Paste the artwork on a coloured background. Sprinkle some glitter on the forest floor.

All artwork is made by students of 11-12 years old

Friday, November 26, 2010

Paper bag city

Made by a student of grade 2

You need:
  1. white drawing sheets A3 size
  2. tempera paint in blue, white and black
  3. brown paper bag
  4. scissors and glue
  5. brushes
Torn some typical city center buildings in various forms out of brown paper bags. Paste them on a white sheet. In front of the high buildings we see smaller ones (overlap). Paint a blue or grey blue sky on the sheet. Use different colours of blue and grey. Outline the buildings with black tempera paint. Paint windows and doors. Hang all artworks together to create a long street.

Friday, November 12, 2010

Pimp Saint Nicholas


In the folklore of the Netherlands, Sinterklaas (Saint Nicholas) is a yearly feast on the evening of December 5th. Sinterklaas celebrates his birthday by distributing presents to all good children. Half November Saint Nicholas comes with is steam boat out of Spain to Holland. With his helpers, a lot of Black Pete's, he visits schools, hospitals, stores ands families. Sinterklaas is dressed in a red toga, with a white slip under it. On his hat he wears a miter. Besides a steam boat, he has a white horse to transport himself. On this horse, Sinterklaas walks on the roofs, to throw children's presents through the chimney's.

You need:

  1. white drawing sheets A3 size
  2. pencil
  3. crayons
  4. scissors and glue
  5. red construction paper
This lesson is about Sinterklaas's clothes. Sinterklaas is so tired of wearing that old dull miter and those boring black shoes; he has never had a fancy bow in his long white beard! Time has come to pimp the Saint!
Write some ideas on the chalkboard: a cap instead of a miter, braids in the beard, sneakers instead of black shoes, a flower toga or a cane with glittering stones or feathers. Of course our pimped Sinterklaas has no dull book anymore, but a cd-rom in a fancy case; he has an Ipod with the newest Spanish hitsongs and the latest cellphone. Everything is allowed, with one restriction: there must be one thing in the drawing that remains us of our old Sinterklaas!
Children scetch their pimped Sinterklaas and colour it with crayons. Cut all Sinterklazen and glue them on red construction paper.