How did you spend this leap day?
We finally had a day off when the weather was picture perfect :) The Redbuds have been calling me and I knew I best take advantage and sketch one while they still had their flowers. They started blooming early this year by about two weeks. The leaves are already starting to pop on this little beauty.
Showing posts with label Pam Johnson Brickell. Show all posts
Showing posts with label Pam Johnson Brickell. Show all posts
Wednesday, February 29, 2012
Thursday, January 26, 2012
Earthshine
Best seen during Crescent Moon phases (the one to five day period before or after a New Moon), Earthshine is caused by direct sunlight on the earth that reflects onto the Moon which creates the smoky glow of the shadowed portion of the moon.
After sunset tonight, take a peek at the sky to see Venus, the Crescent Moon and Earthshine for your very own. Venus will be to the lower left tonight. Happy viewing and hopefully journaling!!
After sunset tonight, take a peek at the sky to see Venus, the Crescent Moon and Earthshine for your very own. Venus will be to the lower left tonight. Happy viewing and hopefully journaling!!
Wednesday, December 14, 2011
Friday, November 11, 2011
An 11.11.11 Thank You
 |
| Please click to enlarge |
This shell will always have a special place on our bookshelves. It's a memento from my Dad's Basic Training days at Parris Island.
He wrote the date on the shell. I can see him walking the shoreline of Port Royal Sound and finding this treasure as he contemplated his next steps into WWII.
I've been wanting to preserve the shell as a journal sketch for the longest time. I can't think of a better day... a more special day than today... to honor it forever :)
Monday, October 24, 2011
Journal Box - Playing with Watercolor Ground
I've been wanting to try Daniel Smith's Watercolor Ground (DSWG) since it first came out. My subject.... a cigar box :)
It's all about repurposing, and now that the smell from the little devil's finally faded, I'm quite excited about the possibilities. Tip: if you have a cigar store in your town, check them out. They sell their boxes for very, very little... Our local store asked $1.00 for the cardboard boxes and $2.00 for the wood boxes!
I decided I liked the red cover on this box and chose to tape off the foil stamped illustration and used this area for application of the DSWG.
Once applied, the DSWG has to cure for 24 to 72 hours before applying watercolor or acrylic. It can also be thinned up to 10% with water. You can see in my second image that the ground looks thin in some spots. My intuition was telling me to add a bit more to even out the first coat, but my adventurous side wanted to see if the uneven coating really mattered. I had several cigar boxes that I applied the DSWG to. My studio was filled with the essence of gesso..... it was a bit too strong from my nose.
You can see in the upper and lower left corners where the ground was applied too thinly. Could I make this work?
Well, yes and no. The lower left corner was a bit too thin and when you view the box in person you can tell.
Painting on the DSWG was similar to the feel of painting on watercolor canvas. It was necessary to dry each application of paint with a hairdryer. Lifting paint is easy and I didn't see any wear on the surface. Truth be told, my lifting was more like scrubbing.....
Almost done! I'll let this sit for a couple of days and no doubt tweak the image a bit more. The last step will be to spray it with Golden's MSA Archival Spray Varnish to seal the surface.
This will be home for my Garden Journal - a collection of single watercolor paper sheets... but more on that later :)
Saturday, September 3, 2011
New Fall Low Country Journaling Workshops
Autumn in the low country of South Carolina.... kiss the humidity goodbye and say hello to perfect Carolina blue skies and temperatures that will sooth your soul. Plan an Artful Autumn Get-Away and visit the delightful destination of Beaufort South, Carolina.
A Garden Journal Workshop with Pam Johnson Brickell
October 25, 26 and 27, 2011 • Beaufort, South Carolina
In conjunction with Coastal Art Supply and The Beaufort Inn
Pam is excited to join forces with Beaufort County's own Laura Lee Rose, a Clemson Extension horticulture agent and one of the area's foremost advocates of horticulture. She teaches the Master Gardener curriculum, oversees county-wide horticulture projects, speaks to schools and community groups, and has been active in organizing and promoting Beaufort's downtown community garden.
Learn sketching, page design, watercolor, lettering and artful journaling techniques from Pam and valuable plant identification/information and other horticultural goodies from Laura Lee.
By the end of the workshop you'll experience the joys of keeping a garden journal and discover first hand how it can be utilized to plan your garden and serves as a record of your gardening trials and triumphs.
Oh yes..... lunch is provided by Southern Graces - the ultimate treat!
Oh yes..... lunch is provided by Southern Graces - the ultimate treat!
For information and registration call Coastal Art Supply at 843-524-2787
And.............
Pam just can't contain herself and must share the fun :)
Being offered at
Coastal Art Supply in Beaufort, South Carolina
843-524-2787
Painting NightScapes Plein Air - The Hunter's Moon
November 8 − 10, 2011
Tues: 1 − 4 pm
Wed and Thurs 4:30 − 7:30 pm
Tues: 1 − 4 pm
Wed and Thurs 4:30 − 7:30 pm
For the workshop description, please click here
The Beaufort, SC link above has hotel and vacation rental options under the 'lodging' link.
No matter which part of the these wonderful United States you want to head off to for an Artful Autumn Get-Away.... or if you would like to try an online workshop, there are plenty to choose from. Check out the complete listings on this blog here.
Location:
Beaufort, SC, USA
Thursday, August 25, 2011
The Making of a Page
Just because a sketch is made in the spring doesn't mean the page gets finished then :) I got caught up in some research about May Day...
There was a lot of room left on the paper when I finished my plein air pen and watercolor sketch. And, since it was May Day and the sketch of Sparkleberry... Well you know, just that tree's name on my tongue makes calligraphic notes sing in my head! I decided to settle into a more controlled environment to finish the dressing on this May Day page.
A tissue paper overlay is a great way to experiment with the placement of other elements you want to add to your page. It keeps the paper from being compromised from too much erasing.
The trick is matching the same placement that you like on the overlay. There are transfer papers you can use, or you can flip over the overlay and trace what's on the front side using a very soft pencil. Once finished, flip it back to the original side,lay it over your journal page and retrace your original lines with a sharp pencil. Lift the overlay tissue off of your journal page and your lettering will/should be on the paper beneath.

But, I know from experience that I lose total spontaneity when I use these methods. My lines become stiff as I get caught up in left brain control. I honor my free flowing plein air sketch too much to let that happen. I want all the elements to compliment that freedom. So I guess-ti-mate :)
My version of cooking without a recipe :)
There was a lot of room left on the paper when I finished my plein air pen and watercolor sketch. And, since it was May Day and the sketch of Sparkleberry... Well you know, just that tree's name on my tongue makes calligraphic notes sing in my head! I decided to settle into a more controlled environment to finish the dressing on this May Day page.
A tissue paper overlay is a great way to experiment with the placement of other elements you want to add to your page. It keeps the paper from being compromised from too much erasing.
The trick is matching the same placement that you like on the overlay. There are transfer papers you can use, or you can flip over the overlay and trace what's on the front side using a very soft pencil. Once finished, flip it back to the original side,lay it over your journal page and retrace your original lines with a sharp pencil. Lift the overlay tissue off of your journal page and your lettering will/should be on the paper beneath.

But, I know from experience that I lose total spontaneity when I use these methods. My lines become stiff as I get caught up in left brain control. I honor my free flowing plein air sketch too much to let that happen. I want all the elements to compliment that freedom. So I guess-ti-mate :)
My version of cooking without a recipe :)
 | |||||||
| Click on images to enlarge :) |
Sunday, August 14, 2011
Journaling on 'Whitelines' Paper
We picked a great day to go to the beach on Hilton Head Island, SC. Instead of a mid-week visit, we chose Saturday.... the day of check out/check in for vacationers. While everyone else was stuck in traffic on Route 278, we and a decent amount of people were enjoying a beautiful day at the beach :)
On the technical side...
I made this journal entry in a new journal by WHITELINES. This is a Swedish company that makes a toned paper using white for lines. They also offer paper with grids (squared), isometric lined notepads and perspective lined notepads. There are many choices of binding: hard covered spiral, soft covered flexible and glued pads.
The paper has a nice feel. I estimate it to be about 24# in weight. I've been using Pentel energel and Signo uniball ballpoint pens on it and have experienced no smudging. The ink in these pens is water soluble. Micron pens remain waterproof on it's surface.
I used watercolor pencils on the page above with minimal water using a Niji waterbrush. The paper did buckle but, that was no surprise. I think colored pencils would really work well on this surface, perhaps even pan pastels. When you turn the page over you can see a little bleed through, but not nearly as much as you do with Moleskine's regular journal paper.
WHITELINES claims that when pages are copied or scanned the white lines and toned background will disappear.
 |
| Click to enlarge |
As you can see above, that was not the case when I scanned the page at my scanners normal settings. I had to lighten the overall exposure of the original scan, lost some subtle tones, but the page on the right is a lot cleaner looking.
I do like how the ink really stands out on the paper. And the toned surface is easier on your eyes versus looking at dark lines on a white surface. I liked working on a paper with grids. My type lines remained square to the page :)
Overall, I like the paper for the written word. Perhaps next time I choose to add an illustration I'll test colored pencils...
Saturday, July 16, 2011
Full Thunder Moon
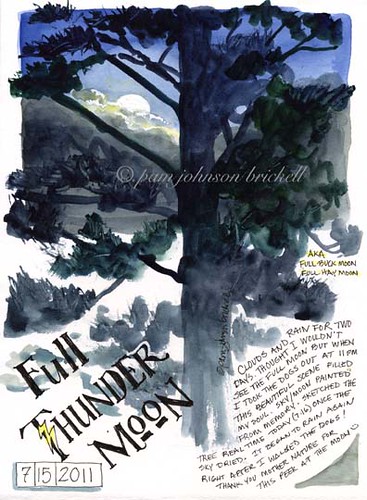
Full Thunder Moon, a photo by PJBee on Flickr.
This was the scene last evening when I took the dogs out for their last pee trip. I had written off being able to see July's full moon.... but the clouds parted briefly and I was there.... quite accidentally! It brought to mind the Lemony Snicket's line that I read on Jan Yates blog recently....
It is one of life's bitterest truths that bedtime so often arrives just when things are really getting interesting. ~Lemony Snicket
I painted the sky and moon from memory and the tree plein air today :)
Monday, July 4, 2011
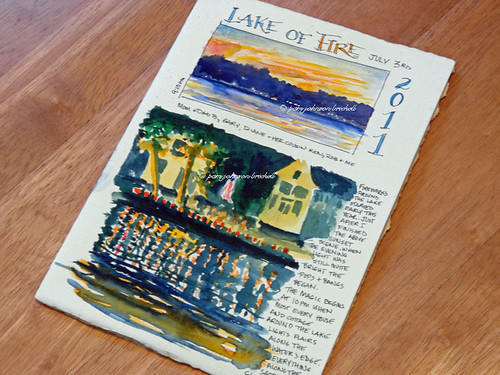
Lake of Fire on Conesus Lake
In Western NY on Conesus Lake, the 3rd of July is very special. The law turns it's head and the lake property owners have a huge celebration. At 10 pm everyone lights flares that have been placed along the shore line and the whole lake lights up. Fireworks all around, people everywhere. Fun!!
Monday, June 27, 2011
Thursday, June 16, 2011
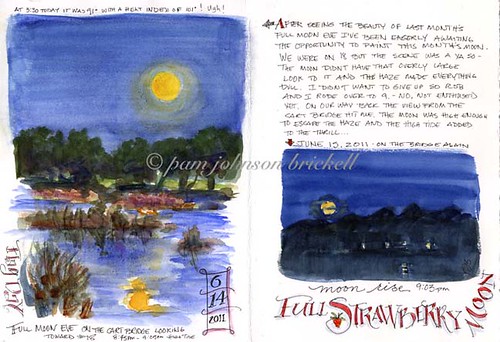
Stawberry Moon Eve and Full Moon
You know I can't let a full moon pass me by :)
One more painting at Sketching in Nature blog. And, the full story on my blog.
One more painting at Sketching in Nature blog. And, the full story on my blog.
Sunday, June 5, 2011
Waiting? Not a Problem :)
I so love having a small journal in my purse. Doctor visits are rarely without a wait.
I don't often sketch people and welcome the opportunity to practice. I'm getting more and more comfortable sketching faces and all in the comfort of my journal :)
I don't often sketch people and welcome the opportunity to practice. I'm getting more and more comfortable sketching faces and all in the comfort of my journal :)
Thursday, May 5, 2011
Pam Johnson Brickell's new class--don't miss it!
Recreate Your Garden in a Box An Unbound Garden Journal Thank you ROZ for the inspiration! May 24, 25 & 26 · 10 am - 3:30 pm in Beaufort, SC at Coastal Art Supply & The Gardens of The Beaufort Inn |
Pam is excited to join forces with Beaufort County's own Laura Lee Rose, a Clemson Extension horticulture agent and one of the area's foremost advocates of horticulture. She teaches the Master Gardener curriculum, oversees county-wide horticulture projects, speaks to schools and community groups, and has been active in organizing and promoting Beaufort's downtown community garden.
Learn sketching, page design, watercolor, lettering and artful journaling techniques from Pam and valuable plant identification/information and other horticultural goodies from Laura Lee.
By the end of the workshop you'll experience the joys of keeping a garden journal and also how this journal can be used to plan your gardens and be a record of your gardening trials and triumphs.
The fact that you'll be creating an 'unbound' journal takes away the scary 'Oh, I messed up that page!' scenario and will inspire you to new journaling heights! Come join the fun!
Register at
Coastal Art Supply · 843-524-2787
You'll receive a small supply list upon registration
Fee: $250 which includes a box lunch each day.
Limited to 10 participants.
A few rooms are available for a special rate at the Beaufort Inn.
Please call 843-379-4667 and mention the workshop and Coastal Art Supply
Wednesday, April 27, 2011
Journaling at a Favorite Golf Tournament
Golf courses are one of my favorite places to sketch. Every year that we can, my husband and I attend The Heritage, a PGA tournament that takes place at the Harbour Town Golf Links in Sea Pines Plantation on Hilton Head Island, SC.
On practice days, I will make a quick watercolor sketch and then have the tour players autograph the page. The most 'artsy' signatures that decorated my pages this year were Jesper Parnevik's and Ian Poulter's. They really got into it :)
Once the tournament officially begins, I park myself in one spot and pick a view that sparks my interest. Most of the time, Rob and I like to sit at the intersections of holes 2,3,6 and 7. It gives Rob two green and two tee boxes to watch close up action. Day one and two sketches are here.
Day three, we set up our chairs near the green of #14. The view between holes 13 and 14 is one of the prettiest around. The landscape is lush and every year I fall in love with the three Live Oaks that separate the golf holes.
 After about an hour at this location we decided it would be better if we moved back to our favorite spot on the front nine so we could see the last half of the players come through. One very large challenge..... I only had the basics of this scene laid in. Luckily, I had my iPod with me. In between groups of players, I photographed my piece and took a shot of the view. I so love that with a flick of your fingers you can enlarge the image on the screen. Between this image and my memory, I was able to almost finish this piece. I had to wait to get home to add the people on the bleachers.... I got a bit carried away with the green paint and forgot to leave white paper at the top of the bleachers. Thank goodness for gouache :) Nothing like opaque paint to save the day!
On practice days, I will make a quick watercolor sketch and then have the tour players autograph the page. The most 'artsy' signatures that decorated my pages this year were Jesper Parnevik's and Ian Poulter's. They really got into it :)
Once the tournament officially begins, I park myself in one spot and pick a view that sparks my interest. Most of the time, Rob and I like to sit at the intersections of holes 2,3,6 and 7. It gives Rob two green and two tee boxes to watch close up action. Day one and two sketches are here.
Day three, we set up our chairs near the green of #14. The view between holes 13 and 14 is one of the prettiest around. The landscape is lush and every year I fall in love with the three Live Oaks that separate the golf holes.
 After about an hour at this location we decided it would be better if we moved back to our favorite spot on the front nine so we could see the last half of the players come through. One very large challenge..... I only had the basics of this scene laid in. Luckily, I had my iPod with me. In between groups of players, I photographed my piece and took a shot of the view. I so love that with a flick of your fingers you can enlarge the image on the screen. Between this image and my memory, I was able to almost finish this piece. I had to wait to get home to add the people on the bleachers.... I got a bit carried away with the green paint and forgot to leave white paper at the top of the bleachers. Thank goodness for gouache :) Nothing like opaque paint to save the day!
Friday, April 8, 2011
Fast Sketching My Way Around a Wildlife Center
Back in March, Rob and I spent a lovely afternoon walking along the manicured trails of the Oatland Island Wildlife Center of Savannah, GA.
The second feature along the trail was an area where two Sandhill Cranes reside. I didn't want to leave!
They walked over from the far side of their area to right below the bridge we stood on. A few more people came a long and the cranes let out a sound that made all of us jump! Goodness, they are loud!
I sketched and painted for a bit then we made our way to see the Bobcat..... very well hidden.
On to the Red Foxes. Yes! From there we walked to the Birds of Prey area. By then. the no-seeums were having they're way with us!
We saw the Center's herd of White-tailed Deer and then moved on to see the pack of Gray Wolves.
You can observe the wolves from a bridge that overlooks their area or you can go into a building with one-way glass. Both vantage points were exciting as it was feeding time. Nothing like seeing the pecking order of a wolf pack first hand. I'm hoping the addition of color will help the wolf head sketches....
Our last stop... the American Bison. Wow! Pappa is one big dude!!
We were on our way back to the parking lot and I just couldn't stand it... I had to go back to see the cranes again :)
So, a few more crane sketches to surround the Bison :)
I've been hoping to finish these pages with color using the reference photographs we took... hopefully soon. Then I'll add some more words. The first crane page is begging for a calligraphic touch :)
What a great place to practice fast sketching! I can't wait to go back :)
Friday, March 25, 2011
Ut oh, what to do?
Here I was happily journaling along when I found out that March's full moon was extra special. Ut oh, no room left on the moon's page and I already had a start on the next page. What to do?
Laure and Kate had great suggestions but I read those too late, also :) Do we see a pattern here? Ha!
Here's what transpired in journal land:
Laure and Kate had great suggestions but I read those too late, also :) Do we see a pattern here? Ha!
Here's what transpired in journal land:
 |
| Please click images for a large view |
Thursday, March 24, 2011
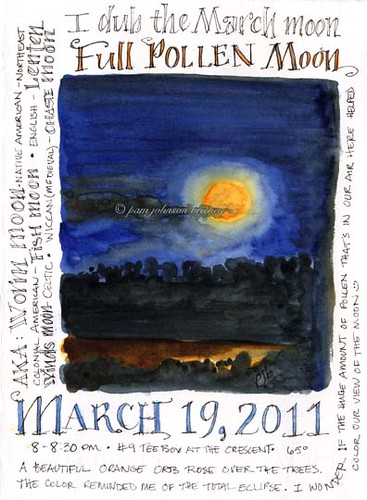
Full Pollen Moon
I gave March's full moon a new name but can't help but think the long ago Native American tribes of this area probably called it Full Pollen Moon too :)
My nose has been so close to the grindstone lately I didn't hear about this moon being so special and called, by some, the 'supermoon' - I'm going to have to figure out how to add a note about this on an already full page!
My nose has been so close to the grindstone lately I didn't hear about this moon being so special and called, by some, the 'supermoon' - I'm going to have to figure out how to add a note about this on an already full page!
Sunday, February 20, 2011
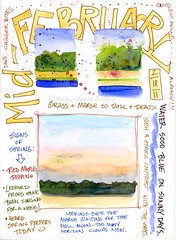
Mid-February Happenings
This started as a memory sketch and ended with a plein air sketch. Did the lettering today. Signs of Spring are everywhere :)
I've been so taken lately with the contrast of colors in this mid-February and mid-winter landscape. The grasses; both lawn and marsh have reached their most dead and dull coloration. The blue of the water on sunny, blue sky days is absolutely brilliant and such a shock to your eyes. Red maples started to pop a few weeks ago so I splattered some red on the page :) It will mean nothing to someone who may thumb through my journal in years to come, but I will know :)
I've been so taken lately with the contrast of colors in this mid-February and mid-winter landscape. The grasses; both lawn and marsh have reached their most dead and dull coloration. The blue of the water on sunny, blue sky days is absolutely brilliant and such a shock to your eyes. Red maples started to pop a few weeks ago so I splattered some red on the page :) It will mean nothing to someone who may thumb through my journal in years to come, but I will know :)
Monday, February 14, 2011
Happy Valentine's Day!
To all my 'Sisters' of the heart and all my art 'Sisters and Brothers'... Happy Valentines Day!
It was glorious here today. A tad chilly this morning but by 11 a.m. all I needed was a sweater vest as my jacket. It was breezy but soooooo sunny. This was our day off and we played outside as much as we could. While Rob practiced hitting golf balls on the range I took a walk with my plein air purse to sketch 'The Sisters' once again. This time plein air and this time for me :) At 2:30 it was 70 degrees!!
I hope love has, in some way, touched your heart today :)
Subscribe to:
Posts (Atom)


